Friday, May 28, 2010

Colorado Springs

I just got home from visiting friends in Colorado Springs last week. It was such a fun week and I loved my time there. We went hiking, went to the zoo, celebrated Canaan's first birthday, played games, and went to Pike's Peak. I also ended up getting to see a friend that I hadn't seen since high school. We had a wonderful time catching up. All in all, a fantastic trip!

Colorado Springs Trip

Enjoy!

Wednesday, April 28, 2010

Bridal Veil Falls

I met some friends for a hike at Bridal Veil Falls over the weekend while Mountain Man worked at home. He hiked with some coworkers on Friday, so he needed to catch up. We only ended going about half a mile up because some little legs gave out, but after a picnic lunch back at the trail head, I decided to go all the way. The hike is only 2 miles and it was rainy on & off throughout the afternoon. I was surprised that it was actually a fairly easy hike until I got to the 101 steps going up to the base of the falls! Let's just say I got a pretty good aerobic workout in that last leg! Bridal Veil Falls was amazing, even though it was a cold, wet, gray day. The force of the water is unbelievable and I was freezing while admiring the massive falls. There was a constant spray of water and I was worried that the camera would be ruined, but so far it's okay. I actually saw a little wildlife that day (emphasis on LITTLE), too. We saw a gorgeous burnt-orange-backed hummer while having our picnic in the parking lot, and then I saw a cute little plump mouse, scurrying around the falls. The rain cleared up a little on my way back and I actually saw the sun and a glimpse of blue sky. It was a wonderful day!

From Bridal Veil Falls


Follow the link for more fun pictures of our day!

Saturday, April 24, 2010

A little trip through Blogland

Fasten your safety harness, grab your snacks and a steaming cup of coffee and enjoy the ride (through Blogland, that is). 

Some of my favorite sites recently (that have been added to my Google Reader):

Knock-off Wood - If you've ever had the desire to build something from scratch, you've GOT to see Anna's site! She's got knock-off plans for all kinds of high-end furniture. I really want to attempt a few things, but I'm so nervous to even try. I don't even understand her easy-to-understand lingo, nor do I have the tools. However, this hasn't stopped me before, so who knows - I might jump right in!

Remodelaholic - Cassity has some awesome tutorials and beautiful inspiration!

Funky Junk Interiors - Donna gives a whole new meaning to "from trash to treasure!" I'm truly blown away by her creativity! I think her stairs are my favorite thing in her awesome house! {I'm really not sure how I can have just one favorite thing in her house...}

Alchemy Junk - Stephanie features some neat techniques (of which rusting is on my list to try), gorgeous creations, and of course, tons of inspiration. She was certainly blessed with some major creative genes!

So You Think You Can Decorate - 10 decorators, 10 challenges, 10 weeks - SO FUN to see their creations each week!

There are more, but I don't want to overwhelm you all at once!

I'm working on my mud room right now and I'll have before and after pics, hopefully by the beginning of next week! Now go get a refill of coffee and get to creating!

Friday, April 23, 2010

Coffee Filter Wreath

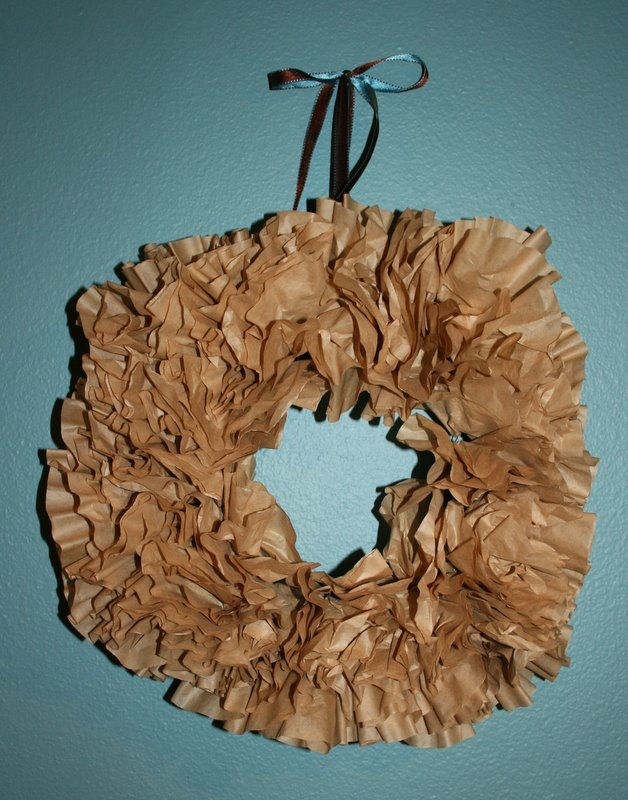
I found this simple, frugal coffee filter wreath on The Little Brown House, and headed to The Dollar Store that same day! I absolutely love it on my teal wall!
Now that I'm looking back at her post, I realize that my wreath is lacking in cuteness. I didn't "scrunch" it at all. Hmmm. Just a minute...Scrunching and fluffing.
There we go, that's got a little more character.

So, Miss Brown House, where is your wreath-making school? I need some skills! LOL She has detailed instructions on her blog, just follow the link above. I used the same wreath base, brown coffee filters, and safety pins that she did. I'm going to try another one with white filters, but this time I'm going to use the u-shaped floral pins she refers to. If I mess with it too much, the safety pins start to come out. I'm not sure what I did wrong or how to correct this problem, but as long as it just hangs there looking pretty on the wall, I think it will be fine.

Total Cost: <$5 ($1 wreath form, $1 safety pins, $2-something for the coffee filters and I had the ribbon

I'd love to see one if you make it!

Thursday, April 15, 2010

Now we're cool

We're not just becoming cool because we're finally getting hip - we all know that will never happen! We're cool because we finally got new ceiling fans! The old 1980's white/gold fans have now been replaced with new bronze/walnut fans from Hunter. It really makes such a difference, especially since they work! :)


I've been really into doing some home improvements lately, so there are more posts to come on this topic!

Thursday, March 18, 2010

Playful Orcas

My sweet friend, Molly and her daughter Andrea have been here all week and we've been busy! We've been busy touring Seattle with some of her family who will be moving here this summer. We've been to the zoo, market, aquarium, and Whidbey Island. I took a day to study and they went to the Needle and did the duck boat tour. Today is the Science Center and who knows what else?! Tomorrow we're spending all day at the Northwest Trek and then they leave late tomorrow night. I've got many pictures from our adventures, but today I want to share a shot of an Orca that I got yesterday.

Yesterday, we took the ferry over to Whidbey Island, and just as we were coming into Clinton on the ferry, Eileen spotted some fins in the water! We hopped out of our car and I snapped a multitude of shots! This one is my favorite, as the whale is spraying water through his blowhole! It was so fun to watch them playing with each other. There was even a baby! This is the closest I've ever been to the whales (even after being on a whale watching expedition)! It was truly a blessing and made my whole day yesterday!

Orca (For whatever reason, Blogger won't upload the photo, so please follow the link!)

More photos to follow after this weekend!

Hope you had a fun St. Patty's day! Did you get pinched?

Wednesday, January 27, 2010

Back in the Stamp Studio

I have actually made quite a few cards lately, but just haven't blogged about them.


In December, I made 20 baby thank-you cards for my friend Anne who had a Sci-Fi themed baby shower. She requested them as her baby gift, so I made 10 of each of the following. These took a long time to make, as they included a lot of detailed hand work. I used my Cuttlebug for the cut-outs and stars. 


The spaceships were made by tracing the circles and hand-cutting 30 of them - 20 yellow and 10 striped that were cut in half. I drew around the outsides of the spaceships and the hole-punched wheels to give it a more polished look. They're all popped up on dimensionals. The aliens were a circle punch that I trimmed down with scissors to give them some body, and include hole-punched ears and drawn-on details. I sponged around them and added a googly eye to really make these guys pop. The stars were embossed with the Cuttlebug and then hand-cut.


I didn't have enough of that cute outer space paper to make 10 more cards, so I came up with a second layout. The blue base was stamped with stars & Versamark and the red layer was CB do give it a little more texture. I used some coordinating papers and adhered 3 strips together to make the striped strip.

Although they took quite a bit of time, I thought they turned out pretty cute and were well-worth the effort.


Supplies:
Stamps: Stars from America the Beautiful (Kim Hughes-CHF) set, Sentiment from Baby wishes (A Muse) set
Paper: SU Real Red, Light Blue CS, and I'll try to find the brand of all of the coordinating striped and outer space
Ink: Black Versafine & Versamark, SU Green Galore for sponging
Accessories: Cuttlebug, scissors, hole punch, Black pen, white gel pen, orange marker, red twine, googly eyes


Have a wonderful Wednesday!